
Chatbots became popular in 2014 by Slackbot, but the concept has been around since 1950. Now, every app and website has a chatbot giving customers a personalized experience. If you’re looking to develop a chatbot, Node.js is the best choice.
Why have Chatbots become so famous?
Chatbots have truly become one of the most prized possession for the customer care departments of every organization. This is because chatbots are more responsive and provide faster solutions for as compared to a human customer care executive.
Why Node.js?
It’s simple. It is the perfect chat development program.
This programming language has a small learning curve. The framework is built to support real-time messages. You can recreate popular chatbots like on Facebook easily on Node.js.
Another advantage of using Node.js is that you can build one from scratch. It provides space to create an API using other frameworks such as Express.js.
This platform is very easy to understand and hence, anyone with some technical knowledge can use this platform to create a chatbox.
What are the prerequisites for building a chatbot?
There are two main components:
Artificial Intelligence
Most developers instill a type of artificial intelligence or AI in their chatbots. The purpose of this is to connect the bot with users and answer different questions. You don’t have to add one with Node.js though. The chatbot will still run perfectly without it and be helpful.
Natural Language Programming (NLP)
Natural Language Programming (NLP) is the other important part. It synthesis language into the chatbot for efficient communication. With Node.js you don’t need to be an expert on this. Simply utilize the NLP library and add it. You can also add other essential and UI buttons to the chatbot.
According to Hubspot (2017), 57% of consumers find chatbots interesting because of their instantaneity.
The steps to creating a chatbot using Node.js
Node.js contains several tools for you to develop the right chatbot for you. For example, BotFather is a telegram API for creating messenger chatbots. There is also Claudia, a bot builder who initiates the process for different applications.
Step 1: Create a project folder in Node.js and set it up
For any messenger, first, create a project folder or app directory. Within this folder create the index.js file. After this set up the folder in this manner:
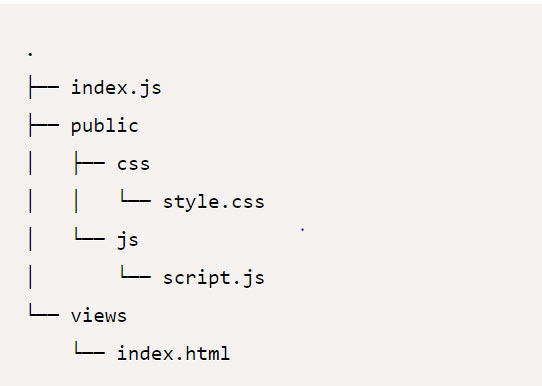
This lays out the structure of the chatbot. It gives you an idea of how the bot will be set up and what is required.
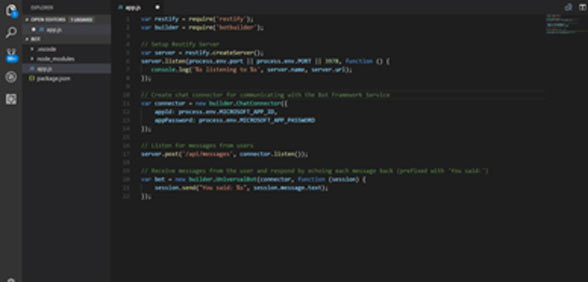
Step 2: Add required modules
After setting up the structure, it is time to add the features you need. Go to the folder from the terminal and create a package.json with the help of init. From here you can install various modules.
You need to use the () function to add the modules. These modules help with functions and storing collected data.
The various tokens present to keep the bot connected to the API and allows you to create new bot objects. Once the basics are down, you can add whatever you wish the bot to communicate.
Source: https://thewebspark.com/2018/01/03/developing-chat-bot-using-node-js-on-windows-10-using-microsoft-bot-framework/
According to PwC (2017), 34% of executives say chatbots freed up their time and allowed them to focus on deep thinking and creating.
Step 3: Test the chatbot
Once you have written and set up the code, run it to see if it works as it should. Make sure that the timing, content, and triggers of the chatbot are in place before testing it.
Run this command by going to the terminal on Node.js:
» cd your-project-folder
» node index.js
This launches the bot and runs it. It is like a preview; allowing you to see how the bot will look to the users. Based on these results modify and tweak as needed.
Step 4: Connect to the database
Once you are satisfied with the functioning of the bot, you need to integrate it with your database. The bot should be able to act as a storage for your bookmarks.
Generally, developers use a firebase module to store the data from the database. This is perfect for cloud-based databases.
Setting it up is easy. Simply go to the Firebase console and login with your Google account. Next, upload the project and follow the next steps. After this, you will be taken to your dashboard on firebase.
Then, click on the RealTime database on the left side and run Test Mode. This lets you add Firebase to your project. The project overview allows you to keep a check on the project.
Conclusion
The beauty of Node.js is that it lets you explore several options. You aren’t restricted to just default chatbot creating settings. Node.js is easy to understand and get familiar with, making it the best choice.


